How To Take A Video On My Macbook
Today, we are going to dive into the world of Macbook screenshots. Whether you are a seasoned Mac user or just starting out, taking screenshots on your Macbook can be a useful tool for capturing important information or sharing moments with friends and family. In this article, we will explore different methods for taking screenshots on your Macbook and highlight some tips and tricks along the way.
How to Take Screenshots on Mac - Capture Your Macbook Screen
When it comes to capturing your Macbook screen, there are several methods you can use. One of the most common ways is to use the built-in screenshot utility that comes with macOS. To take a screenshot using this method, simply press Command + Shift + 3 on your keyboard. This will capture the entire screen and save it as a file on your desktop.
If you only want to capture a specific area of your screen, you can press Command + Shift + 4. This will turn your cursor into a crosshair, allowing you to select the area you want to capture. Once you have selected the area, release the mouse button to take the screenshot.
Another method for taking screenshots on your Macbook is to use the Grab utility, which can be found in the Utilities folder within the Applications folder. Grab allows you to take screenshots of specific windows, the entire screen, or a selected portion of the screen. Simply open Grab, select the type of screenshot you want to take, and follow the on-screen instructions.
Overall, taking screenshots on your Macbook is a simple and straightforward process that can be useful in a variety of situations. Whether you are capturing a funny meme to share with friends or documenting an important piece of information, knowing how to take screenshots on your Macbook is a valuable skill to have.
How to Take a Screenshot on Macbook Pro Laptop

If you are the proud owner of a Macbook Pro laptop, you may be wondering how to take a screenshot on your device. Fortunately, the process is the same as with other Macbook models. You can use the Command + Shift + 3 or Command + Shift + 4 keyboard shortcuts to capture your screen or a specific area, respectively.
Additionally, Macbook Pro laptops come equipped with a Touch Bar, which offers a convenient way to take screenshots. To take a screenshot using the Touch Bar, simply press the Shift + Command + 6 keys. This will capture the entire Touch Bar and save it as an image file on your desktop.
Overall, taking screenshots on your Macbook Pro laptop is a seamless process that can be done quickly and efficiently. Whether you are a student taking notes in class or a professional working on a project, knowing how to take screenshots on your Macbook Pro can be a valuable skill to have.
How To Screenshot On Macbook - Take You Through

For those who are new to the world of Macbooks, taking a screenshot can seem like a daunting task. However, with a few simple steps, you can easily capture your screen and save it for later use. One of the easiest ways to take a screenshot on your Macbook is to use the built-in keyboard shortcuts.
To capture the entire screen, simply press Command + Shift + 3. If you only want to capture a specific area, press Command + Shift + 4 and select the area with your cursor. Once you have taken the screenshot, it will be saved as an image file on your desktop.
Another method for taking screenshots on your Macbook is to use third-party apps or software. There are several apps available on the App Store that offer additional features and customization options for taking screenshots. Some popular options include Snagit, Lightshot, and Skitch.
Overall, taking screenshots on your Macbook is a straightforward process that can be done quickly and easily. Whether you are a student, a professional, or just someone who likes to capture moments on your screen, knowing how to take screenshots on your Macbook is a valuable skill to have.
5 Easy Steps: How To Take Screenshot And Screen Record On Your Mac

If you are looking to take screenshots and screen recordings on your Mac, there are a few simple steps you can follow to get the job done. First, to take a screenshot, use the Command + Shift + 3 or Command + Shift + 4 keyboard shortcuts to capture the entire screen or a specific area, respectively.
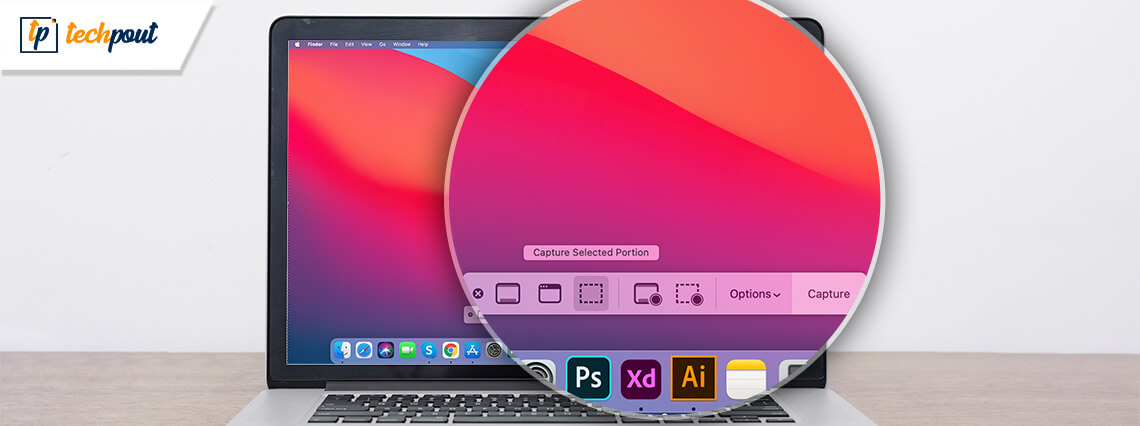
If you want to record your screen, you can use the built-in screen recording utility that comes with macOS. Simply press Shift + Command + 5 to open the screen recording toolbar, select the area you want to record, and click the Record button to start recording. Once you are finished, click the Stop button to save the recording.
In addition to the built-in screen recording tool, there are also third-party apps available for screen recording on your Mac. These apps offer additional features such as editing tools, annotations, and easy sharing options. Some popular screen recording apps for Mac include ScreenFlow, Camtasia, and OBS Studio.
Overall, taking screenshots and screen recordings on your Mac is a simple process that can be done quickly and easily. Whether you are creating tutorials, capturing gameplay footage, or documenting important information, knowing how to take screenshots and screen recordings on your Mac is a valuable skill to have.
Take Screenshot on MacBook - How to - Propatel

When it comes to taking screenshots on your MacBook, there are a few tips and tricks that can help you capture the perfect image. One tip is to use the Command + Shift + 4 shortcut and then press the Spacebar to capture a specific window. This will ensure that your screenshot is clean and well-framed.
Another useful tip is to use the Preview app to edit and annotate your screenshots. Preview allows you to crop, resize, and add text or shapes to your screenshots before saving or sharing them. This can be helpful when highlighting specific areas of the image or adding context to the screenshot.
Lastly, if you find yourself taking screenshots frequently, consider creating a dedicated folder on your desktop to store and organize your screenshots. This can help you keep track of your images and easily find them when needed.
Overall, taking screenshots on your MacBook is a simple process that can be enhanced with a few tips and tricks. Whether you are a student, a professional, or just someone who likes to capture moments on your screen, knowing how to take screenshots on your MacBook is a valuable skill to have.
For more tips and tricks on how to make the most of your Macbook, be sure to check out this article on subjudul. With the right knowledge and tools, you can unlock the full potential of your Macbook and enhance your productivity and creativity.
5 Easy Steps: How To Take Screenshot And Screen Record On Your Mac
thevibely.com How To Take Screenshots On Mac - Capture Your Macbook Screen
www.techpout.com How To Screenshot On Macbook - Take You Through
takeyouthrough.com How To Take A Screenshot On Macbook Pro Laptop
techoreview.com Take Screenshot On MacBook - How To - Propatel
www.propatel.com


Komentar
Posting Komentar